Thursday, 1 June 2017

Making IzzI’s Twig Ring

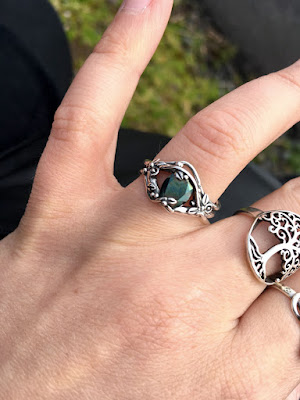
custom made silver ring with spinel.

I get regular requests to make custom rings. Much as I'd love to make a dream ring for everyone who asks, I have learned to be a bit reticent. There just isn't enough time in the day and these rings usually take a lot of time and effort to get right. Venturing into new techniques to suit a request design makes me uneasy as they are not as tried and tested as I like before selling.

This one however took my fancy and inspired me. I have long wanted to make a 'twig' ring. Wrapping miniature branches around the finger and nestling a stone in there for beautiful effect. So I said yes and here is how it went.

Sebastian wanted to surprise his girl IzzI, and after he explained what he would like the ring to look like, we played around with a few sketches to figure out the size of the stone and the layout of the ring.

Nest ring designs

Then I set to work. I work in metal clay, which is tiny particles of reclaimed silver mixed with an organic binder. This allows me to form the ring as you would potter’s clay, but on a tiny scale of course. This clay is very expensive :o)

First I formed the main part of the shank – a long snake to go around the finger on which the stone would sit. The snake had to be thick enough so that the back point of the stone didn’t end up poking the wearer. I then scored tiny grooves in the snake to make it look more like a branch.


Once the clay form is done it is fired at 900 degrees Celsius – the binder burns away and the silver particles sinter together into one form of solid silver. Getting rid of the binder like this means that the form shrinks. So the ring has to be made several sizes larger than the one you want to end up with.

Next I start to build up the detail of the ring, adding more twigs.

Each stage has to dry before I add more, but meanwhile I can make little flowers ready for adding.


And balls. They’re always good to have!

Gradually the ring takes shape. I try to make the balance of elements look nice. The stone has to be gripped by enough silver so that it is set firmly in place, but I don’t want to obscure it too much.


Once I’m happy the ring is VERY carefully sanded. This is fragile clay and a very delicate hand is required. The inside of the shank is smoothed too and the stone cleaned of any silver particles.
Then it’s into the kiln. This is the nerve wracking bit. Clay rings can crack or shrink too much and the stone shatter in the high temperature.
Luckily this one came out without a hitch- just needed to be shaped a bit on a mandrel, then tumble-polished for 2 hours.


To pick out the detail of the leaves and flowers I then oxidise the nice clean ring till it looks like this:


Then nearly all the black stuff is polished off again, but leaving just enough to give a lovely depth and definition to the detail.
Another tumble-polish to make it extra shiny and then the ring is finished!


IzzI and Sebastian went to the Isle of Islay off the coast of Scotland, where Sebastian proposed and IzzI said yes. He sent me this lovely picture of the moment:


Isn't that just gorgeous?

Unfortunately - the stone fell out after a fortnights wear. What did I say about trying and testing new designs? I made the branches around the stone too delicate. The couple have been very understanding and I have now adjusted the branches to be more sturdy and hopefully the stone will now stay in place. 
All the best to Sebastian and IzzI. Thanks you for letting me make your ring and letting me use your lovely pictures. Good fortune and happiness going forward. <3
Friday, 20 January 2017

I've been featured


I've just been feature over on Silver Moss' blog. She is a fellow jeweller I know from Folksy and I have been following her blog for years. She is so much more diligent with her blog than I could ever be, so when she asked me of she could feature me I jumped at the chance.
Do have a look at the post and also stay to check out her regular 'Jewelled Web' posts with tons of interesting links about Jewellery and lots of other stuff.

Silver Moss Jewellery

How is January treating you guys? I went for a walk this morning in the botanical garden and found snowdrops which cheered me up immensely. The day is now 8 hours and 17 minutes long. We're getting there!


Saturday, 3 September 2016

Making the Wild Grasses RIng

Progress shots, the making of a metal clay ring


Here's another quick runthrough of me making one of my most popular rings - The Wild Grass Ring. This one seems to suit both men and women and I love it myself. I'll show a few progress shots and you will see why no two are ever completely the same.


Ring mandrel, sterling silver clay and the grass texture plate.

To start making these rings I needed first to make a texture plate of real grass. I picked some out in one of Sheffield’s lovely parks.
The stalks are then arranged carefully on polymer clay – a soft modelling clay that doesn’t harden until you bake it in the oven.

That done I get the materials ready for the rings.

The clay is rolled out in the right thickness on top of the plate and comes out looking like this:
I then cut out a strip that looks promising and wrap it around a ring mandrel several sizes larger than the finished ring needs to be. The clay shrinks both when it dries and when it is later fired in the kiln.

Here it is on the mandrel. Joining the ends to make a nice looking seam is the tricky part of the process.


Once dry the rings need to be sanded to smooth out all the rough edges


Here are the two rings before and after sanding. My little maker’s mark have also been added to the inside. The rings might not be absolutely round at this stage, they can dry a bit wonky; but that can be fixed once they have been fired.


This is right after firing at 900 degrees Celsius. The clay binder is gone and pure sterling silver is the result. The rings have a matte white appearance at this point and need to be polished. In the tumbler they go.


After an hour in the tumbler the rings are all shiny. Time to make them dirty again :o)


The rings are dipped in oxidation fluid and come out completely matte black. Rubbing with a bit of steel wool brings the white back inside and on all the raised points.


The last thing to do is to burnish and polish the ring, bringing back the sparkle and shine on the edges and the grass pattern.

After a final wax the rings are ready.

Get yours at Sycamoon.com


Thursday, 16 June 2016

Time for a change


I've been thinking about a name change for a while. The name Nanfan is one I have used as a gamertag and nickname since I was 12 wherever such a thin was called for. So when I opened my online shops five years ago without a very clear idea of what I wanted to do with them it seemed natural for me to use that name again.

Back then I started out selling prints of my illustrations and handpainted domino tiles.

Now however, my business is a lot clearer to me - I make handmade jewellery with the inspiration taken from storytelling - fairytales, folklore and fantasy - and also from the nature around me that I love so much - woodland, wildflowers and wilderness.


So I wanted a new name and have been annoying friends and family with every new idea that came to me; "What do you think of Nimue? Nenya? What about Dryad? Maybe it should be two names - Nettle and Nymph?" They showed remarkable patience - thank you guys!
And all of these names where duly googled in case they already existed and I even checked domain names.

In the end the choice seemed simple enough. It's a name I came up with years ago when I was playing online roleplaying games. My character was a druid and I wanted the name to reflect mysticism along with deep roots in nature (there's also a little joke in the name as the character was a tauren - affectionately referred to as cows in the game).
She was called Sycamoon. From Sycamore - a family of trees not native to England but hardy and beautiful. And moon of course - ever a great symbol for the mystical and unearthly.
So there you have it. I think it is perfect for my jewellery and I love that I already have a history with the name.


Monday, 30 May 2016

Making of a Flower Wreath ring with Opal

Opal engagement ring

I thought you might like to see a few process shots of a ring I made recently. It shows the stages we go through when making something in metal clay.

Metal clay is basically a technique for working with silver that circumvents traditional casting and wax moulding. Instead of shaping a ring first in wax and then making a mould around that ring to cast silver in, with metalclay you shape the silver itself.
This is made possible with an ingenious bit of alchemy.
The silver is pulverized into tin particles. Half of the process is in fact already done as this silver is recovered and refined from photographic fluids and the like, so very much recycled silver.
The powder is then combined with an organic binder so that when you add water the mix turns into a clay that you can shape with your hands. It can be hand shaped, rolled into snakes and pressed into moulds. Once it is dry it can be carved, filed and sanded.
Once you've made your delicate clay creation it is then fired with a torch or in a kiln at a very high temperature. The trick is to make it so hot that all the little particles melt on the surface and stick together in a process called sintering. Make it too hot and the silver just melts into a blob. Very sad when that happens. The binder buns away in the heat and you are left with the pure metal.

This is a ring I made for Amy who lives on a long boat. She has a blog here. She wanted an engagement ring that could withstand a bit of water and her favourite stone is opal.


1.       First thing to do is to roll out an even slab in metal clay. The silver particles are mixed with a binder that make it workable like clay. I love working with this stuff
2.       Then cut to the right width – thank God for rulers.


3.       Shaped around a mandrel at this stage the ring has to be a lot bigger than the end target as the ring first shrinks on the mandrel (hence the gap you see) and then again in the kiln
4.       The shank has been filed and refined and is ready for decorations.


5.       The little element in progress here. They fun to make. Some are shaped by hand, some I have made tiny moulds for. I like having plenty to hand once the assembly starts
6.       The setting for surrounding the bezel is cut out in roughly the right size.


7.       Then sanded and made to fit perfectly. Again it has to be slightly larger because it will shrink around the little fine silver bezel
8.       The setting is fitted to the shank using slip clay and a lot of water. A little hole in the bezel gives the clay a good mechanical bond so it won’t fall out.


9.       Flowers and leaves go on one tint bit at a time.
10.   I wear magnifying glasses to see what I’m doing at this stage :o)


11.   The ring has dried and is ready to go in the kiln.


12.   Several hours later it comes out again and is looking good. It has that white look as the silver particles ‘stand up’ straight out of the kiln. When burnished it gets the proper silver look.
13.   Checking the size. Luckily it came out a perfect K


14.   And the stone still fits. Yay
15.   After a few hours in the tumbler the ring comes out all shiny.

16.   Just been dipped in liver of sulphur. Completely black.
17.   Polished back to shiny again. This procedure leaves a little bit of black in all the recesses which emphasizes all the little flowers and details.

18.   Ready for setting the stone. It’s always best to do that last so it doesn’t get damaged during polishing.

The end. Then the ring went to my proper photography station for the last shots before I had to say goodbye.


metal clay process

Monday, 2 February 2015

Design Challenges

fine silver pendant - moon and earth

One thing I've been dying to participate in for a long time is jewellery design challenges. Lots of groups have them and jewellery material suppliers frequently do them too as promotions.
They push you out of your comfort zones and make you design things you wouldn't normally have done. 
I haven't joined in before for various reasons - lack of confidence, scared of harsh judgement and too much to do already, but the group Metal Clay Europe on Facebook had one in January that I am really glad I went for.

The challenge was to make a piece mainly in metal clay with the theme The sun, Moon and Stars.
Brilliant theme.
The support is amazing and there was lots of fantastic entries. I love to see how a single theme can produce such different end results. And I will definitely be going for more challenges in the future.

This is what I did for it:
It's made from Art Clay silver, A dichroic cabochon, 3 yellow czs and two lab spinels - the five gems are tiny. Got a bit carried away with the silver balls - I've been recycling my scrap silver :oD
The back is engraved with a Cameo machine and says "By light of moon and ray of star". The diameter is 34 mm.

It was scary to fire an open piece like this. I supported the 'moon' with fibre blanket so that it wouldn't collapse. It held up beautifully, but the back suffered some distortion because it couldn't shrink evenly around all the silver balls stars (metal clay shrinks in the kiln as it sinters). It took some careful straightening and the back is still a wee bit wobbly, but I am quite pleased with it all in all. It's my first time using glass in a piece and I love how it sparkles in there.