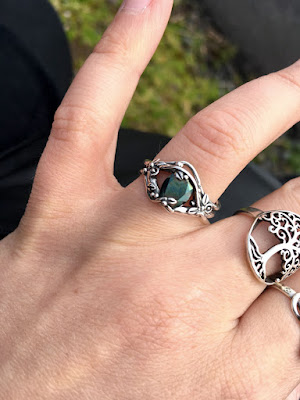
I get regular requests to make custom rings. Much as I'd love to make a dream ring for everyone who asks, I have learned to be a bit reticent. There just isn't enough time in the day and these rings usually take a lot of time and effort to get right. Venturing into new techniques to suit a request design makes me uneasy as they are not as tried and tested as I like before selling.
This one however took my fancy and inspired me. I have long wanted to make a 'twig' ring. Wrapping miniature branches around the finger and nestling a stone in there for beautiful effect. So I said yes and here is how it went.
Sebastian wanted to surprise his girl IzzI, and after he explained what he would like the ring to look like, we played around with a few sketches to figure out the size of the stone and the layout of the ring.
Then I set to work. I
work in metal clay, which is tiny particles of reclaimed silver mixed with an
organic binder. This allows me to form the ring as you would potter’s clay, but
on a tiny scale of course. This clay is very expensive :o)
First I formed the
main part of the shank – a long snake to go around the finger on which the
stone would sit. The snake had to be thick enough so that the back point of the
stone didn’t end up poking the wearer. I then scored tiny grooves in the snake
to make it look more like a branch.
Once the clay form is
done it is fired at 900 degrees Celsius – the binder burns away and the silver
particles sinter together into one form of solid silver. Getting rid of the
binder like this means that the form shrinks. So the ring has to be made
several sizes larger than the one you want to end up with.
Next I start to build
up the detail of the ring, adding more twigs.
Each stage has to dry
before I add more, but meanwhile I can make little flowers ready for adding.
And balls. They’re
always good to have!
Gradually the ring
takes shape. I try to make the balance of elements look nice. The stone has to
be gripped by enough silver so that it is set firmly in place, but I don’t want
to obscure it too much.
Once I’m happy the
ring is VERY carefully sanded. This is fragile clay and a very delicate hand is
required. The inside of the shank is smoothed too and the stone cleaned of any
silver particles.
Then it’s into the
kiln. This is the nerve wracking bit. Clay rings can crack or shrink too much
and the stone shatter in the high temperature.
Luckily this one came
out without a hitch- just needed to be shaped a bit on a mandrel, then
tumble-polished for 2 hours.
To pick out the detail
of the leaves and flowers I then oxidise the nice clean ring till it looks like
this:
Then nearly all the
black stuff is polished off again, but leaving just enough to give a lovely
depth and definition to the detail.
Another tumble-polish
to make it extra shiny and then the ring is finished!
IzzI and Sebastian went to the Isle of Islay off the
coast of Scotland, where Sebastian proposed and IzzI said yes. He sent me this lovely picture of the moment:
Isn't that just gorgeous?
Unfortunately - the stone fell out after a fortnights wear. What did I say about trying and testing new designs? I made the branches around the stone too delicate. The couple have been very understanding and I have now adjusted the branches to be more sturdy and hopefully the stone will now stay in place.
All the best to Sebastian and IzzI. Thanks you for letting me make your ring and letting me use your lovely pictures. Good fortune and happiness going forward. <3


